EXIF rename script

Photo filenames from iPhone comes in a sequence, not to my liking for archival. Here comes JavaScript scripting…

const util = require('util');
const fs = require('fs');
const path = require('path');
const moment = require('moment');  // npm i moment
const ExifImage = util.promisify(require('exif').ExifImage);  // npm i exif

const folder = process.argv[2]; // '/var/services/photo/...';
fs.readdirSync(folder)
  .filter(file => /IMG_\d{4}\.JPG$/i.test(file))
  .forEach(file => {
    const oldName = path.join(folder, file);
    new ExifImage({ image:oldName }, function(error, data) {
      if (!data) return;
      const taken = moment(data.exif.DateTimeOriginal, 'YYYY:MM:DD HH:mm:ss');
      if (!taken.isValid()) return;
      const newName = taken.format('[IMG]_YYYYMMDD_HHmmss[.jpg]');
      console.log(file, taken, newName);
      // fs.renameSync(oldName, path.join(folder, newName));
    });
  });

Activate the rename after testing the script, or upgrade it with argv control.

And then comes HEIC. Let’s try another library.

const util = require('util');
const fs = require('fs');
const path = require('path');
const moment = require('moment');  // npm i moment
const exifr = require('exifr'); // npm i exifr

const folder = process.argv[2];
fs.readdirSync(folder)
  .filter(file => /IMG_\d{4}\.(JPG|HEIC)$/i.test(file))
  .forEach(async file => {
    const oldName = path.join(folder, file);
    const exifData = await exifr.parse(oldName, ['DateTimeOriginal']);
    // console.log(JSON.stringify(exifData));
    if (!exifData) return;

    const taken = moment(exifData.DateTimeOriginal, 'YYYY:MM:DD HH:mm:ss');
    if (!taken.isValid()) return;

    const newName = taken.format('[IMG]_YYYYMMDD_HHmmss') + path.extname(oldName);
    console.log(file, taken, newName);
    // fs.renameSync(oldName, path.join(folder, newName));
  });

And then comes MOV! Didn’t find metadata for MOV, so let’s stick to the created date.

const util = require('util');
const fs = require('fs');
const path = require('path');
const moment = require('moment');  // npm i moment

const folder = process.argv[2];
fs.readdirSync(folder)
  .filter(file => /IMG_\d{4}\.MOV$/i.test(file))
  .forEach(file => {
    const oldName = path.join(folder, file);
    const taken = moment(fs.statSync(oldName).birthtime);
    if (!taken.isValid()) return;
    const newName = taken.format('[IMG]_YYYYMMDD_HHmmss[.mov]');
    console.log(file, taken, newName);
    // fs.renameSync(oldName, path.join(folder, newName));
  });

It should be easy to merge the scripts if needed.

Clean Browser Automation

I try not to pollute my machine with libraries and apps due to my experiments, so I cannot do without Homebrew and Docker. Here’s how I quickly set up an isolated environment for some dirty “browser automation” I needed 😉

https://github.com/SeleniumHQ/docker-selenium

Good quick start guide. As there is no selenium for M1/arm yet, it errors. Adding the platform (and an optional name) works wonders.

projects % docker run -d -p 4444:4444 -p 7900:7900 --shm-size="2g" selenium/standalone-firefox:4.1.1-20211217 
WARNING: The requested image's platform (linux/amd64) does not match the detected host platform (linux/arm64/v8) and no specific platform was requested

projects % docker run -d -p 4444:4444 -p 7900:7900 --shm-size="2g" --platform linux/amd64 --name selfox selenium/standalone-firefox:4.1.1-20211217
ce4ee1ba7b31c59b7c9964abd1c219b87a4ab49098fb4436dd0a1ba797a6896b

As mentioned in the quick start, browse to http://localhost:4444/ to check your sessions and http://localhost:7900/ for VNC to look at the browser.

For the code, here’s Kotlin-in-a-script:

import org.openqa.selenium.*
import org.openqa.selenium.firefox.FirefoxOptions
import org.openqa.selenium.remote.RemoteWebDriver
import java.net.URL

fun WebDriver.f(selector: String): WebElement = this.findElement(By.cssSelector(selector))

fun main() {
    val driver = RemoteWebDriver(URL("http://localhost:4444"), FirefoxOptions())
    try {
        driver.get("https://www.google.com")
        val text = driver.f("input[name=btnI]").getAttribute("value")
        println(text)
    } finally {
        driver.quit()
    }
}

Now I can destroy, recreate and reuse it for other projects easily.

Customizing MBP/M1

I finally parted with my 7-year old MacBook Air for a new WFH setup consisting of

  • Macbook Pro M1
  • 2 x 24″ wide monitors
  • USB-C hub

I added a 10-in-1 USB-C hub as my “dock” to expand my ports. Essentially I require a USB-A for my wireless keyboard set (7 year old also), RJ45 for occasional networking and extra display ports for the dual extended monitors.

My original intention is to just have “one port” connected to my MBP as am I used to the “docking” model, so all the other connectors are served through the hub including USB-C PD and the dual displays. However the hub does not support DisplayLink, so it can only mirror the output and I still have to have an extra HDMI cable connected directly to my MBP. Boo…

UnnaturalScrollWheels

The first obvious discomfort is that Apple decided that it is natural for the mouse wheel should roll in the same direction as the trackpad. Not that it’s wrong, but I usually use the trackpad with Mac but the keyboard and mouse for Windows so my scroll direction is messed up. System Preferences allows me to reverse the scroll, but any setting affects both the trackpad and mouse wheel simultaneously.

Luckily I’m usually not the only one with these problems, and UnnaturalScrollWheels solves this gracefully.

brew install --cask unnaturalscrollwheels

Karabiner Elements

Next are the modifier keys. In Mac-world we have Control, Option and Command, whereas Windows have Ctrl, WinKey and Alt. Even then the Control works in different ways where Copy is Cmd+C vs Ctrl-C. For me because I’ve been using both in home and work I’m able to “code-switch” on both keyboards instead of mapping on to the other.

By setting my Citrix Viewer preferences I was able to get close to the Windows keyboard mapping, but Alt is still on WinKey and the left WinKey is forced to the right WinKey. System Preferences allows me to remap modifiers by input device but I still could not use my left WinKey for my commonly-used keystrokes like Win-E, Win-R with one hand.

Citrix Viewer options

With Karabiner-Elements I was able to remap the right WinKey to the left and push the Alt back to where it was. Finally I can do Ctrl-Alt-Del with peace.

brew install --cask karabiner-elements
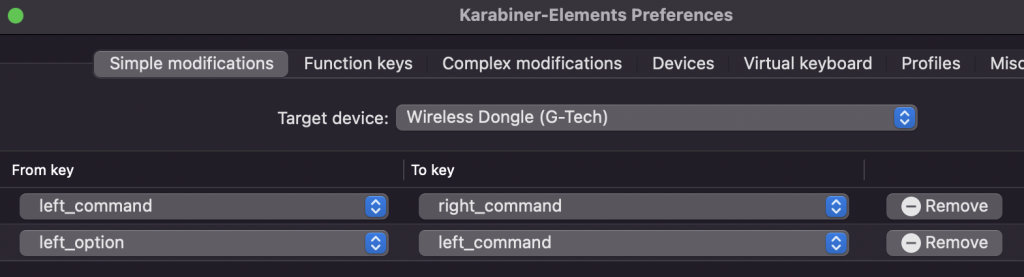
Karabiner configuration

I also noticed that Karabiner can remap mouse clicks, including the middle click on the scroll-wheel. However it did not detect my wheel-scroll, so it was not able to replace UnnaturalScrollWheels.

Bonus Hint: Ctrl-Space for autocomplete may be by default mapped to Spotlight Search or Input Source change (I use multiple input languages) so they may need to be disabled/remapped in System Preferences > Keyboard > Shortcuts.

Bonus Problem: Alt-Tab in Citrix activates app switcher in Mac instead of inside remote Windows. I can still switch with Win-Tab, which is not as bad as Right-WinKey. Karabiner has “complex modifications” that can import rules from the web that seems to support this but I suspect I’ll still need to edit the rules to target an input. Another adventure for another time.

DisplayPlacer

My new monitors were placed above my MBP, giving me a triple-screen (the MBP screen was too big to waste). I decided to have Citrix Viewer span across the dual monitor giving me a dual screen, while my Mac activities remain on the MBP screen.

Triple T

Several issues:

  1. Stretching Citrix Viewer across two displays

In MacOS mission control, “Displays have separate spaces”. With that enabled, a window can only appear in one of the screens. Sure, Citrix Viewer has an View option to “Use all Displays in Full Screen” but that replaces all 3 displays I have, instead of 2.

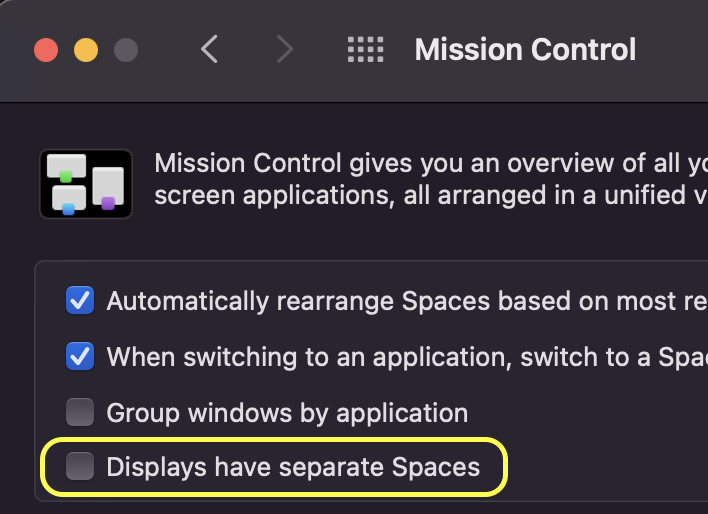
I happily disabled it…
  1. Multiple extended displays with same model

Every time I come back to my workstation (either after a break or the next morning), the monitors and MBP are in sleep mode (which is good). But when I log in again, the MacOS reconnects to the displays and often gets them mixed up. I have to go back to System Preferences to swap the two monitor position each time.

There seem to be no way to consistently force one to be recognized as either one. I tried swapping the HDMI connection or turning them on in sequence, it turns out wrong most of the time.

https://apple.stackexchange.com/questions/49913/is-it-possible-to-get-os-x-to-remember-my-screen-arrangement

After a few days I got really sick of it and decided to fix it. Luckily for displayplacer, I was able to use a command to restore the display layout. On top of that I was able to align my MBP to the real center as in Display Preferences my dragging was not so accurate. (This is relevant to #3)

brew tap jakehilborn/jakehilborn && brew install displayplacer
displayplacer list
displayplacer "id:7F4AE512-B46E-4BDD-B537-4A2915732ADD res:1512x982 scaling:on origin:(0,0) degree:0" "id:EFE602E0-11AF-4FA7-8091-5756E196A81E res:1920x1080 scaling:off origin:(-960,-1080) degree:0" "id:EFE602E0-11AF-4FA7-B26F-A0E49098A77D res:1920x1080 scaling:off origin:(960,-1080) degree:0"

3. Lost window positions and size

After waking the MBP and monitors, not only the display layouts were gone, the windows that were on the extend displays got thrown back to the primary monitor as well. I have to re-position and resize the window each time. So, what if I can script the window position and size back, as well as run the displayplacer together with a global shortcut key? Mac Automator to the rescue!

Automating displayplacer was straightforward, I used “Run Shell Script” task and pasted the output from displayplacer list , the only caveat was to specify the full path as I have brew-ed it. I try to brew where available so I can manage versions, and uninstall it without wondering if I can drag applications to the Bin or I need an uninstaller.

/opt/homebrew/bin/displayplacer "id:7F4AE512-B46E-4BDD-B537-4A2915732ADD res:1512x982 scaling:on origin:(0,0) degree:0" "id:EFE602E0-11AF-4FA7-8091-5756E196A81E res:1920x1080 scaling:off origin:(-960,-1080) degree:0" "id:EFE602E0-11AF-4FA7-B26F-A0E49098A77D res:1920x1080 scaling:off origin:(960,-1080) degree:0"

The window stuff was trickier. I felt AppleScript could do it, but the basic “tell application to set bounds” didn’t work. Ultimately what worked for me was to go through System Events, and have commands to set the position and size separately. Also I discovered “window 1” was the little floating menu at the top so my intended target is “window 2”.

on run {input, parameters}

  tell application "System Events" to tell application process "Citrix Viewer"
    set position of window 2 to {-960, -1080}
    set size of window 2 to {3840, 1080}
  end tell

  return input

end run

Still that wasn’t enough. When I try to set a global shortcut on it, it required permission on whatever app was in the foreground. It does not make sense nor practical to grant every app this access, so an extra workaround to extract the script was required.

do shell script "osascript -e 'tell application \"SetCitrixViewerBounds\" to activate'"

Finally, It works!

Remote Chrome DevTools

If, for whatever reason, you want to use Chrome to inspect a site, but the site tries to be smart and deactivates the functionality when it detects you activate DevTools, you can try to use “Remote debugger” to try to bypass it.

This is achieved by starting Chrome with a debugging port and connecting to it from another Chrome instance.

Step 1: Launch your 1st Chrome instance. This will be your debugger. (This step is needed if not attempting to launch the 2nd Chrome will collapse it to the first one.)

Step 2: Launch 2nd Chrome with debugging port (below for MacOS)

sudo /Applications/Google\ Chrome.app/Contents/MacOS/Google\ Chrome --remote-debugging-port=9222

Step 3: In the 2nd instance, navigate to the target site to be debugged.

Step 4: From the 1st instance, navigate to http://localhost:9222/ and you should see a list of “Inspectable pages”. Click on your target site.

DevTools should open, and you can inspect the site.

NodeJS flush fs.writeFileStream()

Initial problem: Simple. Given a folder of .JSON files, extract attributes and write them to another file. Instead of relying on my trusty Groovy, I took this opportunity to implement it in NodeJS.

First attempt was straightforward. Read the folder, for each file, parse JSON, open new file and write it out.

var folder = '/temp/json/';
for (var file of fs.readdirSync(folder)) {
  var json = JSON.parse(fs.readFileSync(path.join(folder, file)));
  var out = fs.createWriteStream(path.join(folder, file.slice(0, -5) + '.csv'));
  for (var item of json.item) {
    out.write(util.format('%s,%s\n', item.id, item.title));
  }
  out.end();
}

Note: Exception handling, file type checking, etc were removed to retain conciseness and focus on the relevant aspects.

Tested this on folder with 1 file first. Good, output is correct. Tested on 10 files. Same correct output. Now for the first batch of 1000.

Took some time to run, but only 0-byte output files were created. Rate of new file creation also slowed down over time. More tests with less files show that output were all written only after the program ends. Aha! Buffered writes.

That’s still fine, since I get the correct results at the end of the batch. But I get this error before I reach the end, which discards all my buffered writes…

FATAL ERROR: CALL_AND_RETRY_LAST Allocation failed – process out of memory

Not ready to give up (nor just repeat runs with smaller batches), I turned to Google.

This guy has the same problem: no writing before program ends.
http://grokbase.com/t/gg/nodejs/125e84345w/how-to-flush-a-writestream-before-the-program-is-done-executing

Event-Driven Model… Awkward for this case, but I refactored the script to trigger process.nextTick().

var folder = '/temp/json/';
for (var file of fs.readdirSync(folder)) {
  process.nextTick(function(file) {
    var json = JSON.parse(fs.readFileSync(path.join(folder, file)));
    var out = fs.createWriteStream(path.join(folder, file.slice(0, -5) + '.csv'));
    for (var item of json.item) {
      out.write(util.format('%s,%s\n', item.id, item.title));
    }
    out.end();
  }(file));
}

Nope, didn’t help. Is it because all calls were scheduled on the same “next tick”?
Let’s push each file to the subsequent tick.

var folder = '/temp/json/';
var files = fs.readdirSync(folder);

function json2csv(index) {
  if (index >= files.length) return;
  var file = files[index];

  var json = JSON.parse(fs.readFileSync(path.join(folder, file)));
  var out = fs.createWriteStream(path.join(folder, file.slice(0, -5) + '.csv'));
  for (var item of json.item) {
    out.write(util.format('%s,%s\n', item.id, item.title));
  }
  out.end();
  
  process.nextTick(json2csv.bind(null, index+1));
}

process.nextTick(json2csv.bind(null, 0));

Still no. Time to try the 2nd suggestion. out.write() did return false after some writes.

var folder = '/temp/json/';

function json2csv(files, start) {
  for (var i=start; i

And... it works! So much for starting with a 10-line script.

It may not be the best tool for the job (subjective), but sometimes it's more efficient to work with a tool you already know; imagine a NodeJS developer without Groovy knowledge would find this easier to write in Node than in Groovy/Bash/Perl/Python.

Disclaimer: I decided to continue pushing writes even when out.write() returns false to simplify the implementation, because I know each input file was only around 1MB, which is safe to buffer. If the input is unknown, writes within the same file may need to be deferred until drained (maybe by transforming the items into an input stream)

HACK: Change issue creator in Bitnami Redmine

I own the administrator account of a Bitnami Redmine that I installed, but I usually work using a regular user account (Unix rule of not using root). Unfortunately I made the unforgivable mistake of creating a regular issue using the Admin account. For “correctness” sake I tried, and searched if I could modify the creator… (talk about non-repudiation…)

Nope, no default method, or requires a plugin. I don’t intend to do this regularly, so I don’t really need a plugin. I decided to mess with the database directly and see if it was easy to understand the schema. Turns out it was too straightforward.

Notes:

  1. The mysql root password is the same password as the Redmine admin.
  2. I am using a Bitnami Redmine 3.1.0-0 instance, you may need to use “SHOW DATABASES;” to figure out which database.
  3. In the process I used “SHOW TABLES;” and “DESC issues;” to probe the schema. I am just showing the final necessary commands to run.
  4. You can get the issue ID by looking at the URL when the issue is displayed in your browser.
  5. You can mouseover the desired user in the browser to peek at the user’s ID to be used as the author_id.
> ./mysql -u root -p
Enter password: 
mysql> USE bitnami_redmine;
Database changed

mysql> UPDATE issues SET author_id=3 WHERE id=59;

Refresh your browser.

R: Find rows that contains vector

Imagine stations on several train lines. Given a station pair, find the lines that allow travel between these stations (no transfers!)


> # install.packages("qpcR")
> library(qpcR)
> stations = qpcR:::cbind.na(EWL=c("Pasir Ris", "Tampines", "Simei", "Tanah Merah", "Bedok", "Kembangan", "Eunos", "Paya Lebar", "Aljunied", "Kallang", "Lavender", "Bugis", "City Hall", "Raffles Place", "Tanjong Pagar", "Outram Park", "Tiong Bahru", "Redhill", "Queenstown", "Commonwealth", "Buona Vista", "Dover", "Clementi", "Jurong East", "Chinese Garden", "Lakeside", "Boon Lay", "Pioneer", "Joo Koon"),
+                 NSL=c("Jurong East", "Bukit Batok", "Bukit Gombak", "Choa Chu Kang", "Yew Tee", "Kranji", "Marsiling", "Woodlands", "Admiralty", "Sembawang", "Canberra", "Yishun", "Khatib", "Yio Chu Kang", "Ang Mo Kio", "Bishan", "Braddell", "Toa Payoh", "Novena", "Newton", "Orchard", "Somerset", "Dhoby Ghaut", "City Hall", "Raffles Place", "Marina Bay", "Marina South Pier"), 
+                 NEL=c("HarbourFront", "Outram Park", "Chinatown", "Clarke Quay", "Dhoby Ghaut", "Little India", "Farrer Park", "Boon Keng", "Potong Pasir", "Woodleigh", "Serangoon", "Kovan", "Hougang", "Buangkok", "Sengkang", "Punggol"),
+                 CCL=c("Dhoby Ghaut", "Bras Basah", "Esplanade", "Promenade", "Nicoll Highway", "Stadium", "Mountbatten", "Dakota", "Paya Lebar", "MacPherson", "Tai Seng", "Bartley", "Serangoon", "Lorong Chuan", "Bishan", "Marymount", "Caldecott", "Bukit Brown", "Botanic Gardens", "Farrer Road", "Holland Village", "Buona Vista", "one-north", "Kent Ridge", "Haw Par Villa", "Pasir Panjang", "Labrador Park", "Telok Blangah", "HarbourFront"),
+                 DTL=c("Bukit Panjang", "Cashew", "Hillview", "Beauty World", "King Albert Park", "Sixth Avenue", "Tan Kah Kee", "Botanic Gardens", "Stevens", "Newton", "Little India", "Rochor", "Bugis", "Promenade", "Bayfront", "Downtown", "Telok Ayer", "Chinatown"))

> apply(stations, 2, function(route) { all(c("Dhoby Ghaut", "Bishan") %in% route) })
  EWL   NSL   NEL   CCL   DTL 
FALSE  TRUE FALSE  TRUE FALSE 

Excel VLOOKUP in R via Rolling Join

Imagine a car park with different parking costs for parking per hour or part thereof. Assume also there is no pattern, thus a mapping table of hour -> cost:

hr cost
0 0.30
1 0.60
2 0.80
3 1.20
4 1.30
5+ 1.60

Parking beyond 5 hours will max your charges at $1.60.

In Excel there is the VLOOKUP function, with Range_lookup=TRUE to find the nearest match.

In R we can do a rolling join on a data table. Without the roll, it works like Range_lookup=FALSE; it finds an exact match.

> # install.packages("data.table")
> library(data.table)
> fees <- data.table(hr=c(0, 1, 2, 3, 4, 5), 
                   cost=c(0.3, 0.6, 0.8, 1.2, 1.3, 1.6))
> fees
   hr cost
1:  0  0.3
2:  1  0.6
3:  2  0.8
4:  3  1.2
5:  4  1.3
6:  5  1.6
> query <- data.table(parked=c(0.4, 1.5, 2, 2.14, 4.5, 10))
> setkey(fees, hr)
> fees[query]
      hr cost
1:  0.40   NA
2:  1.50   NA
3:  2.00  0.8
4:  2.14   NA
5:  4.50   NA
6: 10.00   NA
> fees[query, roll=TRUE]
      hr cost
1:  0.40  0.3
2:  1.50  0.6
3:  2.00  0.8
4:  2.14  0.8
5:  6.00  1.6
6: 10.00  1.6

PostgreSQL 9.4 on CentOS 6.6

As usual there are many guides out there on installing something on some OS, but with Linux I never got a guide that could bring me straight through (every environment, every version requires different setup). So here’s my very own steps for installing PostgresSQL 9.4 on CentOS 6.6. (also for my future self-reference)

Prerequisites: Ensure DNS and HTTP(S) working for yum, otherwise you may encounter Host not found, etc. (This is out of scope as it may be nameservers or firewall settings)

1. Configure yum repo
Ref: http://tecadmin.net/install-postgresql-on-centos-rhel-and-fedora/

sudo rpm -Uvh http://yum.postgresql.org/9.4/redhat/rhel-6-x86_64/pgdg-redhat94-9.4-1.noarch.rpm
sudo yum install postgresql94-server postgresql94 postgresql94-contrib

2. Initialize the database
Ref: https://wiki.postgresql.org/wiki/YUM_Installation

sudo service postgresql-9.4 initdb
sudo service postgresql-9.4 start

3. Connect and create the database
Ref: http://serverfault.com/questions/110154/whats-the-default-superuser-username-password-for-postgres-after-a-new-install
After default installation, only the “postgres” user can access the database, but it has no password.
Create the database and grant a user access, which you will use to manage the database subsequently (don’t use “postgres” user)

sudo -u postgres psql postgres
    CREATE DATABASE devdb;
    CREATE USER devuser WITH PASSWORD 'devpass';
    GRANT ALL ON DATABASE devdb TO devuser;

4. Allow remote connections
Ref: http://www.thegeekstuff.com/2014/02/enable-remote-postgresql-connection/
pg_hba.conf allows any IP to connect (0.0.0.0) and authenticate using md5. You can also restrict this to your webserver IP only.
postgresql.conf will let the server listen on all attached IPs.

sudo vi /var/lib/pgsql/9.4/data/pg_hba.conf
	host    all     all     0.0.0.0/0       md5

sudo vi /var/lib/pgsql/9.4/data/postgresql.conf
	listen_addresses = '*'

sudo service postgresql-9.4 restart

5. Move the data to another disk
Ref: http://stackoverflow.com/questions/28414558/moving-postgresql-main-folder-out-of-var-lib-postgresql-9-4
My main disk was a default 10GB, enough for OS and programs but not for the database data. I have a spanking new 300GB disk attached, and I want to move the table space to the new disk.
There were several methods involving specifying the data directory but I found it was easier to just link it.

sudo service postgresql-9.4 stop
sudo mv /var/lib/pgsql/9.4/data /media/xvdb1/pgsql/9.4/
sudo ln -s /media/xvdb1/pgsql/9.4/data/ /var/lib/pgsql/9.4/data
sudo chown postgres:postgres /var/lib/pgsql/9.4/data
sudo service postgresql-9.4 start

6. Autostart
Finally, configure PostgreSQL to start itself on boot.

sudo chkconfig postgresql-9.4 on

Ready-to-use PostgreSQL.

ng-admin + JAX-RS: 400 Bad Request on DELETE

I’m tried of building admin UIs and I’m trying out ng-admin. It’s pretty straightforward to setup given the guides and demos.

List, create, updates were fine until I got to the DELETE method. The server was throwing 400 Bad Requests and upon Chrome network inspection I discover that ng-admin was sending a JSON body in the request. I don’t really care who is “following the standard” as long they work together (think browsers and jquery), so I’m fine to fix either side to either the client not send the body, or the server accepting the non-empty body.

ng-admin uses Restangular under the hood to make REST requests. Restangular did have this FAQ about DELETEs with body(s).

A little refactoring and presto! DELETE now works.


app.config(['RestangularProvider', function(RestangularProvider) {
  RestangularProvider.setRequestInterceptor(function(elem, operation) {
    return (operation === "remove") ? undefined : elem;
  });
}]);